Java Basics 108 – Class and Object
PREREQUISITE
IDEone gives you few benefits:
1) Zero setup. You just need Internet Connection and a modern Web Browser.
2) Online storage. You can refer back to the codes at later time.
3) Public codes available. You can also see how others write codes and learn from them as well.
4) Online Learning. You can ask a companion at remote location to help edit the codes or review your codes for improvements or troubleshooting algorithms.
STEPS
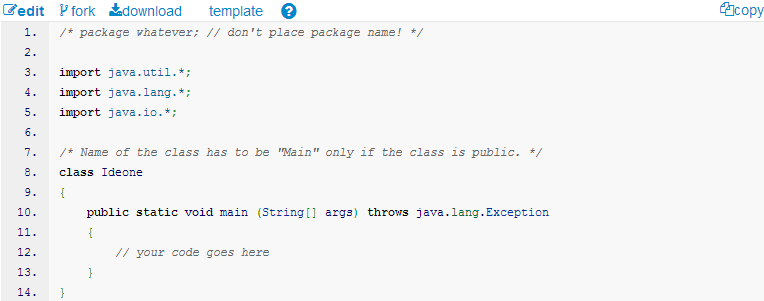
1) Start with the basic template
Clone the code above. (Click the Fork button).
2) Create Java Class
2-1) Declare a class ExamDetails
/* package whatever; // don't place package name! */
import java.util.*;
import java.lang.*;
import java.io.*;
/* Name of the class has to be "Main" only if the class is public. */
class ExamDetails
{
public static void main (String[] args) throws java.lang.Exception
{
// your code goes here
}
}
|
2-2) Add second class StudentResults
/* package whatever; // don't place package name! */
import java.util.*;
import java.lang.*;
import java.io.*;
/* Name of the class has to be "Main" only if the class is public. */
class ExamDetails
{
public static void main (String[] args) throws java.lang.Exception
{
// your code goes here
}
}
class StudentResults {
}
|
2-3) Add properties to the StudentResults class.
/* package whatever; // don't place package name! */
import java.util.*;
import java.lang.*;
import java.io.*;
/* Name of the class has to be "Main" only if the class is public. */
class ExamDetails
{
public static void main (String[] args) throws java.lang.Exception
{
// your code goes here
}
}
class StudentResults {
String Full_Name;
String Exam_Name;
String Exam_Score;
String Exam_Grade;
}
|
2-4) Declare a StudentResult object called aStudent
/* package whatever; // don't place package name! */
import java.util.*;
import java.lang.*;
import java.io.*;
/* Name of the class has to be "Main" only if the class is public. */
class ExamDetails
{
public static void main (String[] args) throws java.lang.Exception
{
StudentResults aStudent= new StudentResults();
}
}
class StudentResults {
String Full_Name;
String Exam_Name;
String Exam_Score;
String Exam_Grade;
}
|
2-5) Assign property value to aStudent
Try printing the value.
/* package whatever; // don't place package name! */
import java.util.*;
import java.lang.*;
import java.io.*;
/* Name of the class has to be "Main" only if the class is public. */
class ExamDetails
{
public static void main (String[] args) throws java.lang.Exception
{
StudentResults aStudent= new StudentResults();
aStudent.Exam_Name="VB.NET";
String exam=aStudent.Exam_Name;
System.out.println(exam);
}
}
class StudentResults {
String Full_Name;
String Exam_Name;
String Exam_Score;
String Exam_Grade;
}
|
2-6) Change access to class property in StudentResults.
Try running the code.
/* package whatever; // don't place package name! */
import java.util.*;
import java.lang.*;
import java.io.*;
/* Name of the class has to be "Main" only if the class is public. */
class ExamDetails
{
public static void main (String[] args) throws java.lang.Exception
{
StudentResults aStudent= new StudentResults();
aStudent.Exam_Name="VB.NET";
String exam=aStudent.Exam_Name;
System.out.println(exam);
}
}
class StudentResults {
private String Full_Name;
private String Exam_Name;
private String Exam_Score;
private String Exam_Grade;
}
|
At this point, the compiler will output error message:
Main.java:13: error: Exam_Name has private access in StudentResults
aStudent.Exam_Name="VB.NET";
^
Main.java:14: error: Exam_Name has private access in StudentResults
String exam=aStudent.Exam_Name;
^
2 errors
|
Comment (//) those lines that have got errors.
2-7) Add an initiating method (Constructor ) to StudentResults.
a) The name of the method is similar to the name of the class.
b) The parameters of the method are assigned to the property of the class.
/* package whatever; // don't place package name! */
import java.util.*;
import java.lang.*;
import java.io.*;
/* Name of the class has to be "Main" only if the class is public. */
class ExamDetails
{
public static void main (String[] args) throws java.lang.Exception
{
StudentResults aStudent= new StudentResults();
//aStudent.Exam_Name="VB.NET";
//String exam=aStudent.Exam_Name;
//System.out.println(exam);
}
}
class StudentResults {
private String Full_Name;
private String Exam_Name;
private String Exam_Score;
private String Exam_Grade;
StudentResults (String name, String grade){
Full_Name=name;
Exam_Grade=grade;
}
}
|
At this point, if you try to compile, you may get errors because the new object declaration parameter doesn’t match with the constructor parameter declaration.
Main.java:12: error: constructor StudentResults in class StudentResults cannot be applied to given types;
StudentResults astudent= new StudentResults();
^
required: String,String
found: no arguments
reason: actual and formal argument lists differ in length
|
2-8) Change the constructor declaration.
a) Omitting parameter
b) Assigning default values to all class properties.
/* package whatever; // don't place package name! */
import java.util.*;
import java.lang.*;
import java.io.*;
/* Name of the class has to be "Main" only if the class is public. */
class ExamDetails
{
public static void main (String[] args) throws java.lang.Exception
{
StudentResults aStudent= new StudentResults();
//aStudent.Exam_Name="VB.NET";
//String exam=aStudent.Exam_Name;
//System.out.println(exam);
}
}
class StudentResults {
private String Full_Name;
private String Exam_Name;
private String Exam_Score;
private String Exam_Grade;
StudentResults (){
Full_Name="No name given";
Exam_Name="Unknown";
Exam_Score="No Score";
Exam_Grade="Unknown";
}
}
|
Note: delete the statement marked with “//”
2-9) Create method to change class property.
/* package whatever; // don't place package name! */
import java.util.*;
import java.lang.*;
import java.io.*;
/* Name of the class has to be "Main" only if the class is public. */
class ExamDetails
{
public static void main (String[] args) throws java.lang.Exception
{
StudentResults aStudent= new StudentResults();
}
}
class StudentResults {
private String Full_Name;
private String Exam_Name;
private String Exam_Score;
private String Exam_Grade;
StudentResults (){
Full_Name="No name given";
Exam_Name="Unknown";
Exam_Score="No Score";
Exam_Grade="Unknown";
}
String fullName (String aName){
Full_Name=aName;
return Full_Name;
}
}
|
2-10) Edit the main method.
a) Add a call to class method.
b) Add an output statement to print the class property value.
/* package whatever; // don't place package name! */
import java.util.*;
import java.lang.*;
import java.io.*;
/* Name of the class has to be "Main" only if the class is public. */
class ExamDetails
{
public static void main (String[] args) throws java.lang.Exception
{
StudentResults aStudent= new StudentResults();
String sName = aStudent.fullName("Bill Gates");
System.out.println( sName );
}
}
class StudentResults {
private String Full_Name;
private String Exam_Name;
private String Exam_Score;
private String Exam_Grade;
StudentResults (){
Full_Name="No name given";
Exam_Name="Unknown";
Exam_Score="No Score";
Exam_Grade="Unknown";
}
String fullName (String aName){
Full_Name=aName;
return Full_Name;
}
}
|
2-11) Add another method to class StudentResults
/* package whatever; // don't place package name! */
import java.util.*;
import java.lang.*;
import java.io.*;
/* Name of the class has to be "Main" only if the class is public. */
class ExamDetails
{
public static void main (String[] args) throws java.lang.Exception
{
StudentResults aStudent= new StudentResults();
String sName = aStudent.fullName("Bill Gates");
System.out.println( sName );
}
}
class StudentResults {
private String Full_Name;
private String Exam_Name;
private String Exam_Score;
private String Exam_Grade;
StudentResults (){
Full_Name="No name given";
Exam_Name="Unknown";
Exam_Score="No Score";
Exam_Grade="Unknown";
}
String examName(String examCode){
if (examCode.equals("VB")){
Exam_Name="Visual Basic.NET";
}
else if (examCode.equals("JV")){
Exam_Name="Java";
}
else if (examCode.equals("C#")){
Exam_Name="C# .NET";
}
else if (examCode.equals("PH")){
Exam_Name="PHP";
}
else {
Exam_Name="No Exam Selected";
}
return Exam_Name;
}
}
|
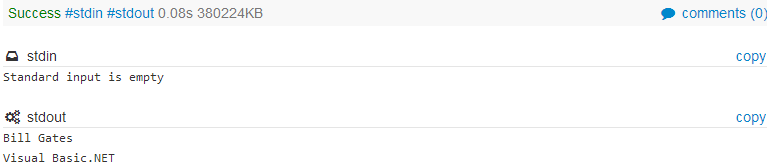
2-12) Edit main method
a) Add a call to the new class method.
b) Add an output statement to print the returning value.
/* package whatever; // don't place package name! */
import java.util.*;
import java.lang.*;
import java.io.*;
/* Name of the class has to be "Main" only if the class is public. */
class ExamDetails
{
public static void main (String[] args) throws java.lang.Exception
{
StudentResults aStudent= new StudentResults();
String sName = aStudent.fullName("Bill Gates");
String exam = aStudent.examName("VB");
System.out.println( sName );
System.out.println( exam );
}
}
class StudentResults {
private String Full_Name;
private String Exam_Name;
private String Exam_Score;
private String Exam_Grade;
StudentResults (){
Full_Name="No name given";
Exam_Name="Unknown";
Exam_Score="No Score";
Exam_Grade="Unknown";
}
String examName(String examCode){
if (examCode.equals("VB")){
Exam_Name="Visual Basic.NET";
}
else if (examCode.equals("JV")){
Exam_Name="Java";
}
else if (examCode.equals("C#")){
Exam_Name="C# .NET";
}
else if (examCode.equals("PH")){
Exam_Name="PHP";
}
else {
Exam_Name="No Exam Selected";
}
return Exam_Name;
}
}
|
3) More Class Methods
REFERENCE