|
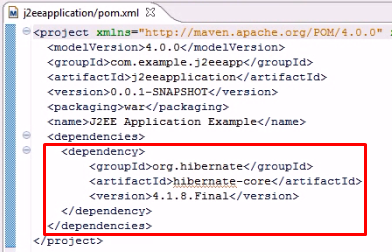
<modelVersion>4.0.0</modelVersion>
<groupId>com.example.j2eeapp</groupId>
<artifactId>j2eeapplication</artifactId>
<version>0.0.1-SNAPSHOT</version>
<packaging>war</packaging>
<name>J2EE Applications Example</name>
<dependencies>
<dependency>
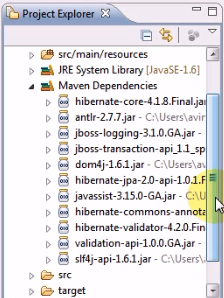
<groupId>org.hibernate</groupId>
<artifactId>hibernate-core</artifactId>
<version>4.1.8.Final</version>
</dependency>
<dependency>
<groupId>org.hibernate</groupId>
<artifactId>hibernate-validator</artifactId>
<version>4.2.0.Final</version>
</dependency>
<dependency>
<groupId>junit</groupId>
<artifactId>junit</artifactId>
<version>4.8.2</version>
<scope>test</scope>
</dependency>
<dependency>
<groupId>org.springframework.webflow</groupId>
<artifactId>spring-webflow</artifactId>
<version>2.3.0.RELEASE</version>
</dependency>
<dependency>
<groupId>org.springframework.webflow</groupId>
<artifactId>spring-faces</artifactId>
<version>2.3.0.RELEASE</version>
</dependency>
<dependency>
<groupId>org.springframework</groupId>
<artifactId>spring-orm</artifactId>
<version>3.1.1</version>
</dependency>
<dependency>
<groupId>com.oracle</groupId>
<artifactId>ojdbc14</artifactId>
<version>10.2.0.1.0</version>
</dependency>
<dependency>
<groupId>log4j</groupId>
<artifactId>log4j</artifactId>
<version>1.2.16</version>
</dependency>
<dependency>
<groupId>com.sun.faces</groupId>
<artifactId>jsf-impl</artifactId>
<version>2.1.10</version>
<dependency>
<groupId>com.sun.facelets</groupId>
<artifactId>jsf-facelets</artifactId>
<version>1.1.14</version>
</dependency>
<dependency>
<groupId>com.sun.faces</groupId>
<artifactId>jsf-api</artifactId>
<version>2.1.10</version>
</dependency>
<dependency>
<groupId>commons-dbcp</groupId>
<artifactId>commons-dbcp</artifactId>
<version>20030825.184428</version>
</dependency>
<dependency>
<groupId>javax.servlet</groupId>
<artifactId>slf4j-log4j12</artifactId>
<version>1.6.4</version>
</dependency>
<dependency>
<groupId>org.springframework</groupId>
<artifactId>spring-tx</artifactId>
<version>3.0.5.RELEASE</version>
</dependency>
<dependency>
<groupId>xml-apis</groupId>
<artifactId>xml-apis</artifactId>
<version>1.3.02</version>
</dependency>
<dependency>
<groupId>org.springframework.security</groupId>
<artifactId>spring-security-web</artifactId>
<version>3.1.0.RELEASE</version>
</dependency>
<dependency>
<groupId>org.springframework.security</groupId>
<artifactId>spring-security-config</artifactId>
<version>3.1.0.RELEASE</version>
</dependency>
<dependency>
<groupId>org.primefaces</groupId>
<artifactId>primefaces</artifactId>
<version>3.4</version>
</dependency>
<dependency>
<groupId>cglib</groupId>
<artifactId>cglib</artifactId>
<version>2.2.2</version>
<scope>runtime</scope>
</dependency>
<dependency>
<groupId>org.hibernate</groupId>
<artifactId>hibernate-entitymanager</artifactId>
<version>4.1.8.Final</version>
</dependency>
</dependencies>
</project>
|