STEPS
1) Service Panel
1-1) Click on the Services panel.

2) Starting Virtual Database Server
2-1) Right-click Databases, select Start Server.

2-2) Outcome (in the Output Window).

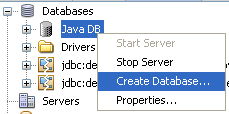
3) Creating Database
3-1) Right-click the Service Databases/Java DB, select Create Database.
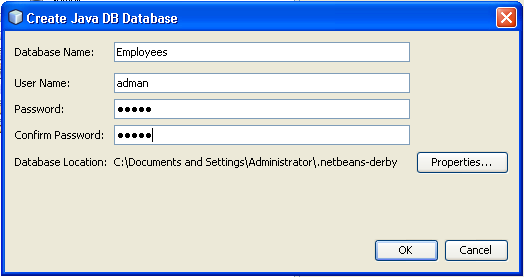
3-2 ) Enter Database setup details
Database Name: Employees
User Name: adman
Password: adman
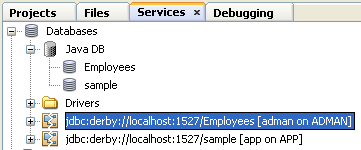
3-3) Database creation is done.
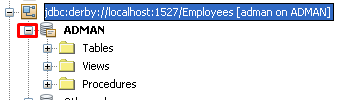
3-1) Right-click the database item, select Connect…
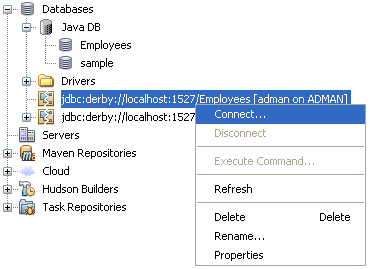
3-2) Connection to Employees Database is established under the ADMAN credential.

3-3) Explode ADMAN.
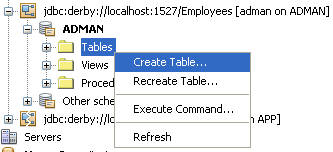
4) Create Table
4-1) Right-click the Table item, select Create Table.
4-2) Type “Workers” in the Table name field.
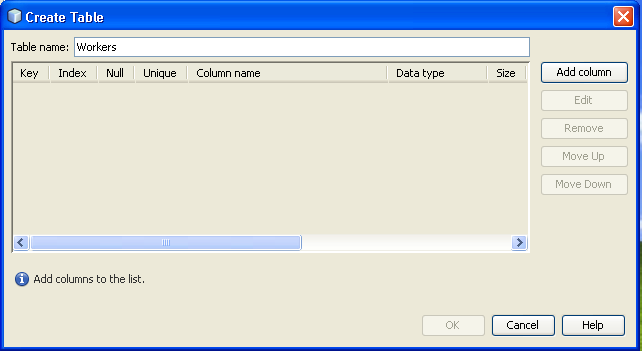
4-3) Click Add Column button and enter Column details as follows.
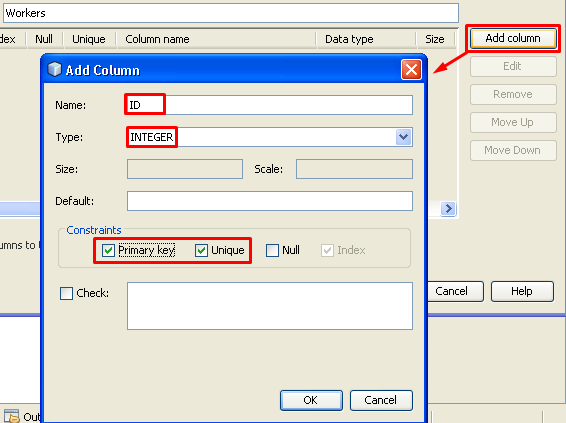
4-4) Click OK twice to go back to Main Application.
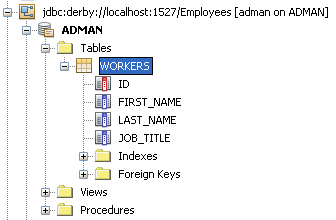
Notice that the table Workers and its column ID has been created.

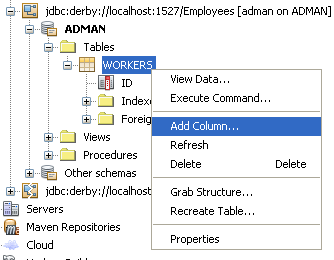
4-5) Create more columns.
Right-click the table WORKERS, select Add Column…
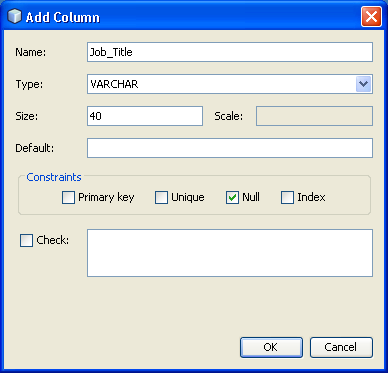
4-6) Fill in Column Details.
Enter the following values for this column (VARCHAR means a variable number of characters):
Key: UncheckedIndex: UncheckedNull: CheckedUnique: UncheckedColumn Name: First_NameData Type: VARCHARSize: 20

For the third column in your table, enter the following values:
Key: UncheckedIndex: UncheckedNull: CheckedUnique: UncheckedColumn Name: Last_NameData Type: VARCHARSize: 20

For the final column, here are the values to enter:
Key: UncheckedIndex: UncheckedNull: CheckedUnique: UncheckedColumn Name: Job_TitleData Type: VARCHARSize: 40
4-7) Outcome.
5) Add Records
5-1) Right-Click the WORKERS table.

5-2) The Database Editor shows up in the Main Panel.
5-3) Enter a new record.
Click the New Record button.

5-4) Insert Record Window pops up.
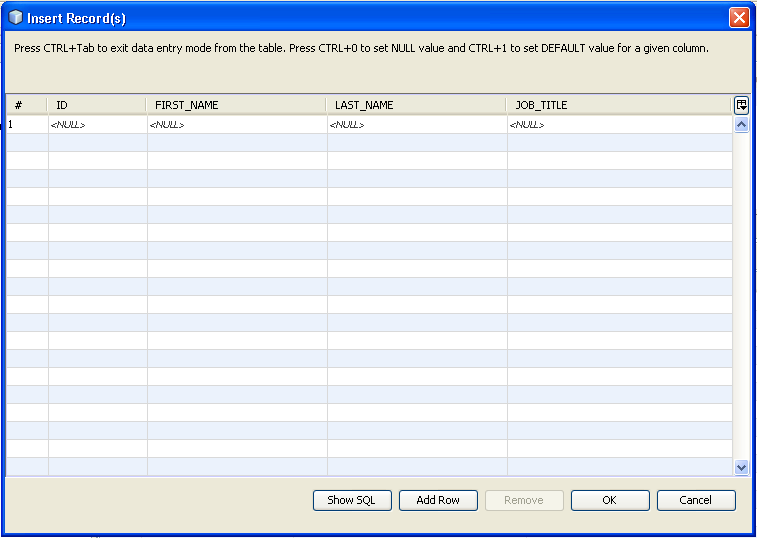
5-5) Enter the new record.
1) Double click to get into the cell.
2) Press [ENTER] to go out from the cell.
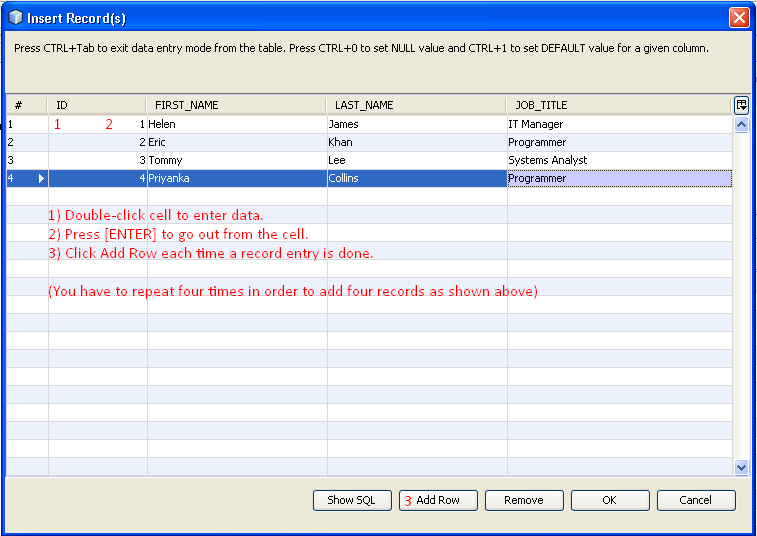
3) Click Add Row button when a single record entry is done.
ID: 1First Name: HelenLast Name: JamesJob Title: IT Manager
ID: 2First Name: EricLast Name: KhanJob Title: Programmer
ID: 3First Name: TommyLast Name: LeeJob Title: Systems Analyst
ID: 4First Name: PriyankaLast Name: CollinsJob Title: Programmer
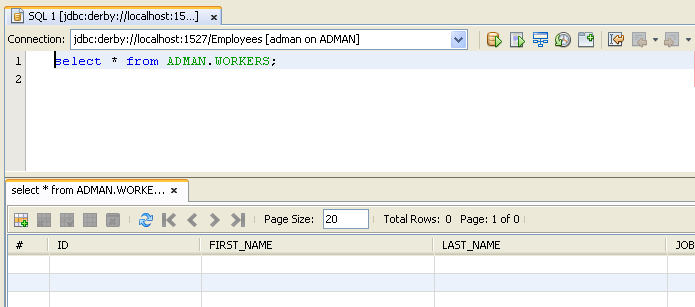
5-6) Outcome.
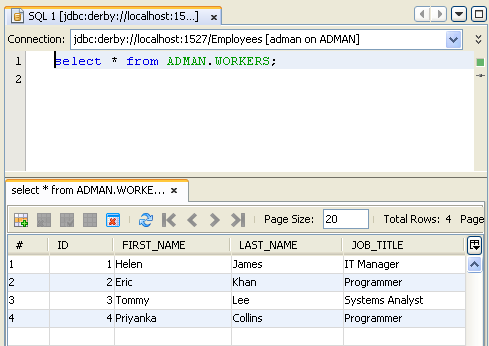
6) SQL Command
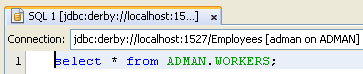
6-1) Notice in the Step 5-6, the SQL Window shows the command “select * from ADMAN.WORKERS;”
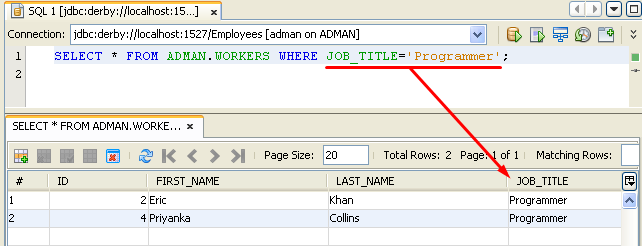
6-2) Filter by Column Value.
Type the following SQL Statement and click Run Statement button.
6-3) Filter Records by range of values.
Type the following SQL Statement and click Run Statement button.
SELECT * FROM ADMAN.WORKERS WHERE ID > 2;
|

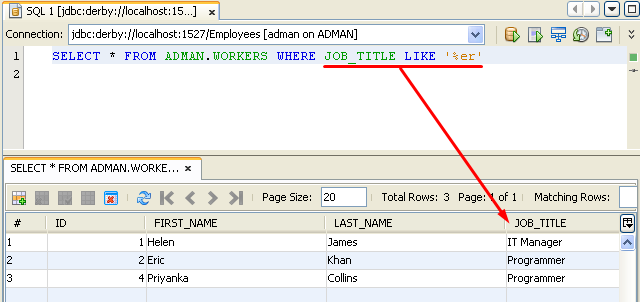
6-4) Filter Records by matching string values.
Type the following SQL Statement and click Run Statement button.
SELECT * FROM ADMAN.WORKERS WHERE JOB_TITLE LIKE '%er';
|
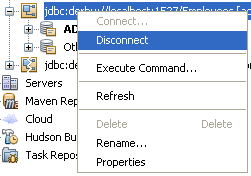
7) Disconnect Database and Stop Server
7-1) Disconnect Database.
7-2) Stop Server.

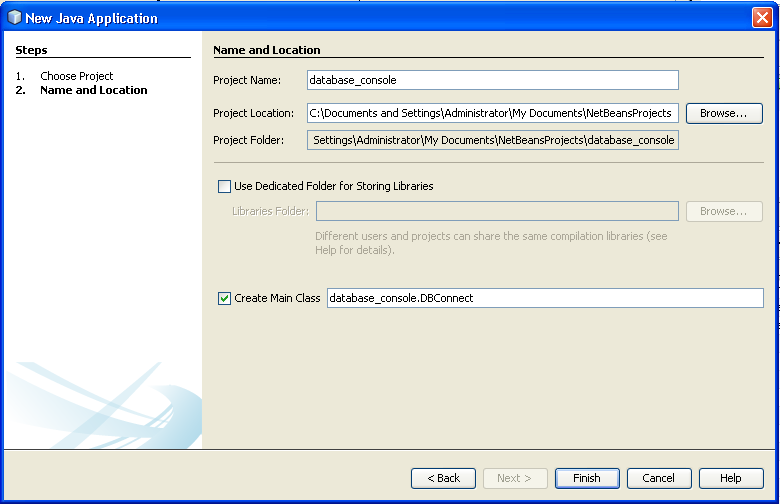
8) Create A New Project
8-1) Click New/Project. Select Java Application.
8-2) Package=database_console. Main Class=DBConnect.
8-3) Outcome.

9) Edit Codes
8-1) Replace the computer generated codes with the following codes.
package database_console;
import java.sql.Connection;
import java.sql.DriverManager;
import java.sql.SQLException;
public class DBConnect {
public static void main(String[] args) {
String host = "jdbc:derby://localhost:1527/Employees";
String uName = "adman";
String uPass = "adman";
Connection con = DriverManager.getConnection(host,uName,uPass);
}
}
|
8-2) Outcome.

Notice the error message.
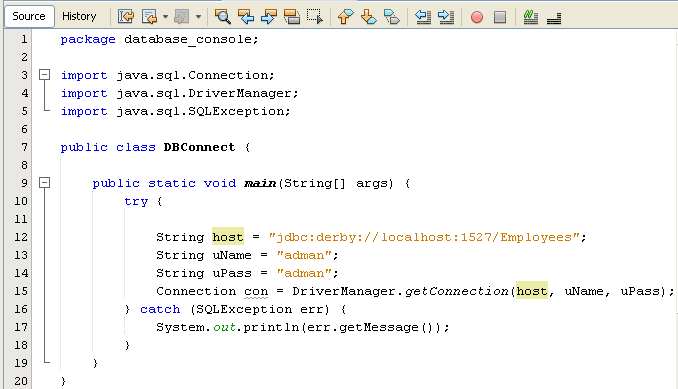
8-3) Change the code by including TRY…CATCH block.
package database_console;
import java.sql.Connection;
import java.sql.DriverManager;
import java.sql.SQLException;
public class DBConnect {
public static void main(String[] args) {
try {
String host = "jdbc:derby://localhost:1527/Employees";
String uName = "adman";
String uPass = "adman";
Connection con = DriverManager.getConnection(host, uName, uPass);
} catch (SQLException err) {
System.out.println(err.getMessage());
}
}
}
|
8-4) Outcome.
Error message is gone now.
10) Running Java Program To Connect To Database Server
10-1) Click Run button.
10-2) Connection Refused Error.
You may get this error message in the console window:
"java.net.ConnectException : Error connecting to server localhost on port 1527 with message Connection refused: connect."
|
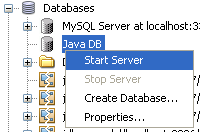
If you do, it means you haven't connected to your database server. In which case, right click on Java DB in the Services window. From the menu that appears, click Start Server:
You need to make sure that any firewall you may have is not blocking the connection to the server. A good firewall will immediately display a message alerting you that something is trying to get through, and asking if you want to allow or deny it. When you allow the connection, your NetBeans output window should print the following message:
"Apache Derby Network Server - 10.4.1.3 - (648739) started and ready to accept connections on port 1527 at DATE_AND_TIME_HERE"
|
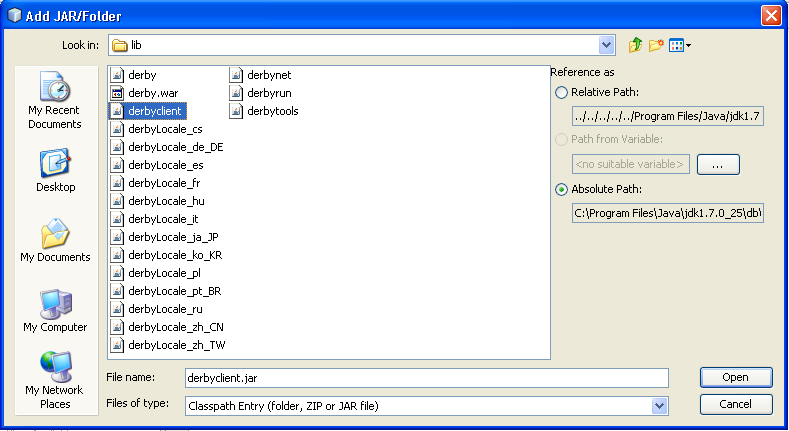
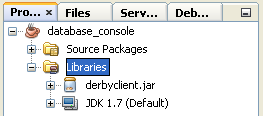
10-3) Driver Not Found Error.
Once your server is started, run the programme again. There's a very good chance you'll get another error message:
"No suitable driver found for jdbc:derby://localhost:1527/Employees"
|
The reason for this error is that the DriverManager needs a Driver in order to connect to the database. Examples of drivers are Client Drivers and Embedded Drivers. You can import one of these so that the DriverManager can do its job.

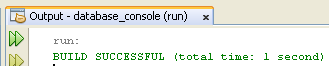
10-4) If there is no error, you should get the usual output.
11) Fetching Data Into Program.
11-1) Selecting a record.
package database_console;
import java.sql.Connection;
import java.sql.DriverManager;
import java.sql.ResultSet;
import java.sql.SQLException;
import java.sql.Statement;
public class DBConnect {
public static void main(String[] args) {
try {
String host = "jdbc:derby://localhost:1527/Employees";
String uName = "adman";
String uPass = "adman";
Connection con = DriverManager.getConnection(host, uName, uPass);
Statement stmt = con.createStatement();
String sql = "SELECT * FROM Workers";
ResultSet rs = stmt.executeQuery(sql);
rs.next();
int id_col = rs.getInt("ID");
String first_name = rs.getString("First_Name");
String last_name = rs.getString("Last_Name");
String job = rs.getString("Job_Title");
String p = id_col + " " + first_name + " " + last_name + " " + job;
System.out.println(p);
} catch (SQLException err) {
System.out.println(err.getMessage());
}
}
}
|
11-2) Outcome.

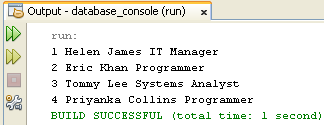
11-3) Selecting multiple records.
package database_console;
import java.sql.Connection;
import java.sql.DriverManager;
import java.sql.ResultSet;
import java.sql.SQLException;
import java.sql.Statement;
public class DBConnect {
public static void main(String[] args) {
try {
String host = "jdbc:derby://localhost:1527/Employees";
String uName = "adman";
String uPass = "adman";
Connection con = DriverManager.getConnection(host, uName, uPass);
Statement stmt = con.createStatement();
String sql = "SELECT * FROM Workers";
ResultSet rs = stmt.executeQuery(sql);
while (rs.next()) {
int id_col = rs.getInt("ID");
String first_name = rs.getString("First_Name");
String last_name = rs.getString("Last_Name");
String job = rs.getString("Job_Title");
String p = id_col + " " + first_name + " " + last_name + " " + job;
System.out.println(p);
}
} catch (SQLException err) {
System.out.println(err.getMessage());
}
}
}
|
11-4) Outcome.
No comments:
Post a Comment